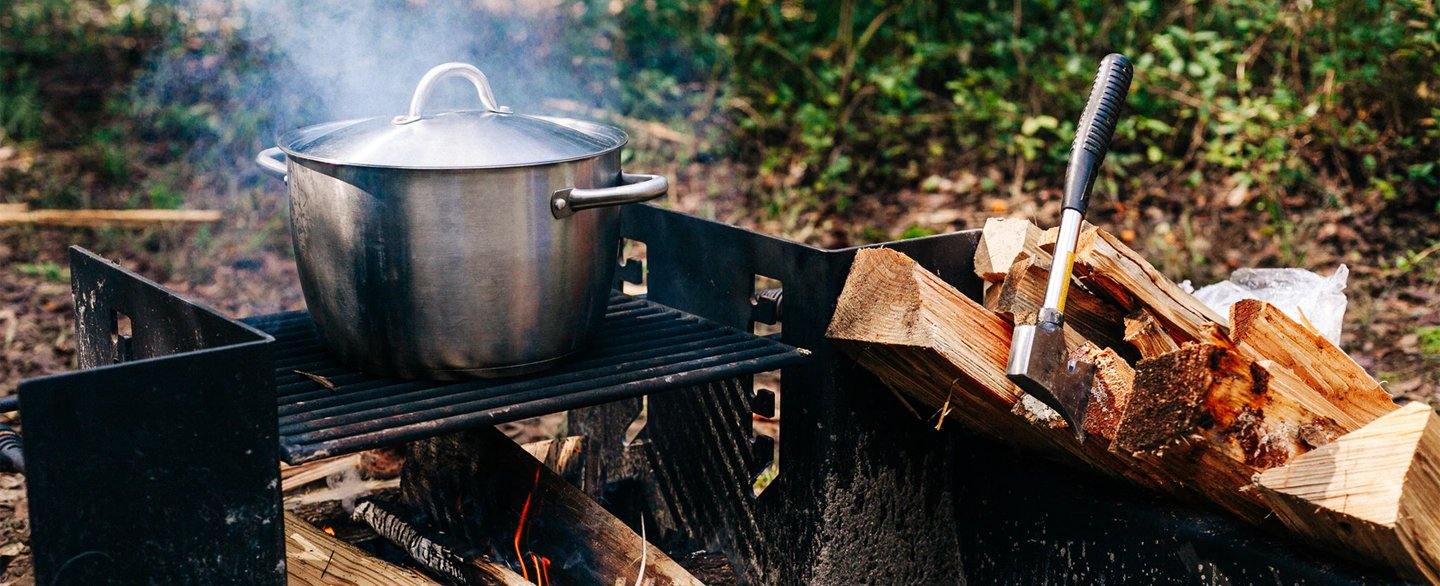
The Dutch oven is a simple yet invaluable tool for campfire cooking—a true must-have in your off-grid cooking arsenal. Its versatility in blackout scenarios is second to none. You don’t need electricity to boil, bake, fry, or sauté.
But don’t be fooled by its simplicity. It takes time and know-how to get the most out of a Dutch oven and to avoid burning or undercooking valuable food.
Read on for a guide to boosting your Dutch oven skills in five steps.
1. Choose the Right Dutch Oven

Home Use vs. Campfire
Home Dutch ovens have flat bottoms and are sealed in enamel. Popular brands include Le Creuset and Staub. They are designed to be used in a home kitchen, on a stovetop, and/or in an oven. They are NOT designed to be used with a campfire—this is an important distinction.
Camping Dutch ovens, on the other hand, are made entirely from cast iron, have support legs on the bottom, and a flat flanged lid. Popular brands include Lodge and Camp Chef. They are designed to be used with hot charcoal as well as wood embers from a campfire.
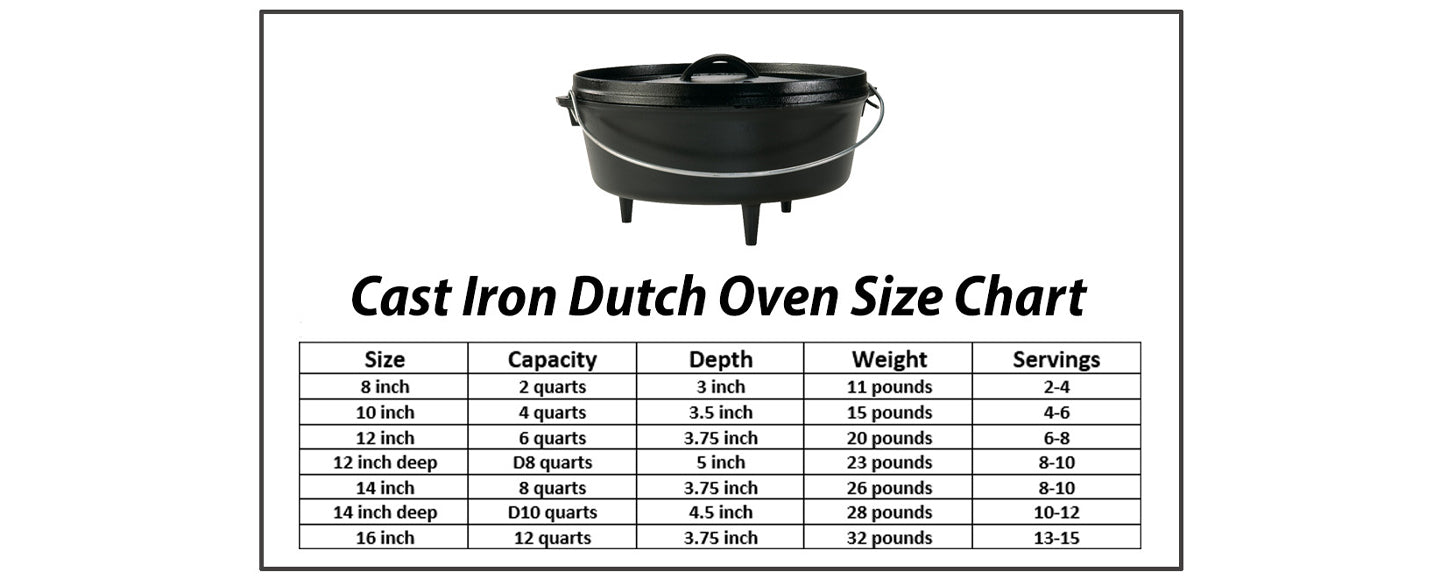
Selecting the Right Size
Camping Dutch ovens come in many different sizes. There are two main shapes—shallow and deep—as well as different diameters, which are usually measured in inches.
- Shallow: Sometimes referred to as “bread” ovens, shallow Dutch ovens are best for baking because the lid is closer to the food on the inside. In our opinion, shallow Dutch ovens are also the most versatile version and allow you to cook any recipe.
- Deep: Deep Dutch ovens are best for large quantities of soups, stews, and braises. Since the lid is farther from the food inside, it doesn’t brown the top of baked goods as well. But the increased volume is great for feeding a large crowd.
- Diameter: The most common diameters we’ve seen are 10” and 12”. Unless you are cooking for a large crowd those sizes are really all you need.
Additional Accessories:
- Lid Lifter: A good lid lifter is designed to both take the lid off of your Dutch oven (keeping it steady, so coals don’t fall into your food) as well as lift the Dutch oven itself.
- BBQ Tongs: You can use a shovel, but the tongs make placing just the right number of embers on the top of your lid when cooking easier.
- Oven Glove: A welder’s glove works great for this, but anything that can help you handle very hot objects is what you want.
- Lid Stand: This is an optional item, but very handy to have. It gives you a clean spot to set your lid, plus if you turn it over, it makes a great stand to put the lid on for frying with (the inside of a Dutch oven lid makes an excellent frying pan).
2. Learn Techniques for Proper Care
Seasoning a Dutch Oven
Most Dutch ovens come pre-seasoned and only need to be washed with a little bit of soap (just once with hot water).
After washing, set the Dutch oven on a heat source (like your stove top or camp stove) and let it dry completely. You can wipe your oven with a little shortening or cast iron conditioner and let it cool before you put it away.
You do not have to apply oil or grease the oven every time you use and wash it—just when it looks like it needs it. If you have a pot that is not pre-seasoned, it has a wax coating that needs to come off.
Steps for Seasoning a Dutch Oven:
- Wash the pot and lid with hot soapy water, rinse well, and dry off with paper towels.
- Coat the entire pot and lid with a thin layer of shortening and place them in a 450-500 degree barbeque grill upside down (so the shortening will not pool) on the rack. Shut the lid and leave in the grill for one hour.
- Turn off heat and leave in the grill till cool. This should create a nice black patina on the cast iron.
- If you are not satisfied with the results, repeat the process over.
- You can do this procedure in your home oven but it smells and smokes up the house so be sure to open a few windows!
Cleaning and Caring for a Dutch Oven

After you are done with your meal and ready to clean up, put some hot water in your pot and use a scraper to loosen all the food.
- Dump out existing water and put fresh hot water in the pot.
- Use a plastic scrubber to clean it out well.
- Dump out the dirty water again and then rinse completely with hot water.
- Place the pot on a heat source and let it dry out completely.
- Now you can give it a thin coat of shortening or cast iron conditioner applied with a paper towel.
- Let it cool.
- If you do not have a cover for your Dutch oven, insert a folded paper towel half in and half out in the pot and place the lid on top and cook it. You will want a bit of air to circulate around the pot, so find a ventilated place.
- If you have a cover for your Dutch oven, place the lid right-side up in the bottom of the cover and then set the pot on top of the lid.
- Always store your Dutch ovens in a dry area.
3. Learn the Art of Campfire Dutch Oven Cooking
To use a Dutch oven in a camp setting, you should start by making a good cooking fire. This means being patient and waiting for a good bed of coals to build up. You will be able to cook more evenly if you can get the heat from coals rather than dancing flames. It is best to prepare the food you’ll be cooking away from the fire and set it aside until you are ready to cook, just as you would at home.
Once the coal bed and food are prepared, place the Dutch oven on top of the coals and put the lid on, making sure it fits tightly so that no coals get into your food. Shovel some coals on top of the lid to evenly cover the pot. If possible, use a few larger pieces rather than a lot of ash. This will help ensure that no ash falls into the food when you check on it during the cooking process.

Dutch oven cooking usually moves along faster than cooking in a home oven. You should check on the status of your meal earlier than you normally would, and more continuously throughout the process.
Start with checking every 10 minutes or so and adjust your time according to how fast cooking is moving along from the beginning. It should continue at the same rate throughout the process. If there is uneven cooking, rotate the Dutch oven partway through the process.
Charcoal or Embers?
If you’re using your Dutch oven to bake or braise, you will want heat coming from the top and the bottom. And to do that, you will need to use either charcoal or wood embers.
Charcoal Briquettes: The consistent shape of briquettes makes it easier to evenly distribute heat. You can use a temperature chart (see below) to roughly estimate the number of charcoal briquettes you will need on top and bottom to achieve a certain temperature.
Lump Hardwood Charcoal: Less processed than briquettes, lump charcoal is irregularly shaped, making it more challenging to formulaically determine equal heat distribution. While lump charcoal lights faster, we find it doesn’t have the staying power of briquettes. So you may need additional lump charcoal to replace midway to maintain temperature.
Wood Embers: You can also use embers from your campfire to heat your Dutch oven. However, the quality of the embers will be determined by the type of wood you’re burning. Softwoods like the pine typically sold at campgrounds produce weak embers that die out quickly. Hardwoods like oak, almond, maple, and citrus produce embers that last much longer.
4. Temperature Matters—Learn to Control It
Most baking in a Dutch oven is done at 350° F. For 10″ and 12″ ovens, a quick way to figure out how many charcoal briquettes you will need to achieve this temperature is to double the diameter of your Dutch oven and add one. So, for example, if you have a 10” Dutch oven, you will need about 21 briquettes for 350° F.
As for the ratios, you want about one-third of the coals on the bottom and two-thirds of the coals on top. So, for the example above, you would want seven coals on bottom and 14 on top.
While this is a good rule of thumb, it is by no means exact. Outside air temperature, type of charcoal, and the volume of the food will all affect the temperature.
If you really want to know the exact internal temperature of your Dutch oven, we recommend getting an instant-read probe thermometer. However, with a little experience, you can assess the temperature by hovering your hand over the coals and feeling the heat radiating off. There is a bit of a learning curve to this, but with practice, you’ll get there. Until then, this chart is a good place to start.

For recipes with cook times longer than 30 minutes, you will need to add fresh coals midway through the cooking process to maintain a consistent temperature. So be sure you have a fresh batch ready when the time comes.
5. Learn to Manage a Fire, Learn to Manage Heat
Just like home grilling, a lot of Dutch oven cooking centers around heat management. How hot are your coals? Where is the heat going? And how long will that heat last?
Wind Shelter

One of the biggest challenges when doing any type of cooking outdoors is the wind. Windy conditions will steal heat from your coals and cause them to burn out quicker. So, it’s advisable to try and buffer the wind as much as possible.
- Rock wind shelter: A small, semi-circle rock shelter is quick to construct and can be very effective against the wind.
- Fire ring: If cooking at an established campground, it’s easiest (and safest) to use your Dutch oven inside the provided fire ring (which also doubles as a wind shelter).
- Dutch oven table: If you’re serious about Dutch oven cooking, they make metal table tops with wind blockers. This also allows you to work standing up rather than hunching down on the ground.
Rotating the Lid
One way to prevent hot spots and ensure your food heats evenly is to rotate the lid and body of the Dutch oven about every 15 minutes. Using the handle, rotate the body of the Dutch oven a quarter turn. Using a lid-lifter or heat resistant gloves, lift the lid slightly and rotate a quarter turn in the opposite direction.
Stacking Multiple Dutch Ovens
If you have multiple Dutch ovens and limited coals, you can stack your ovens on top of one another. This stacking method allows you to use the top coals of the bottom Dutch oven as the bottom coals for the top Dutch oven.
Obviously, you should start with the Dutch oven with the widest diameter on the bottom.
While Dutch oven stacking can be really fun, be prepared to throw the coal ratio chart out the window. The right number coals on top for the bottom Dutch oven is the wrong number of coals on the bottom for the top Dutch oven (if that makes sense). The whole thing gets way too messy to figure out in a formula.
Once you have mastered the basics like stews, chili, dumplings etc., you will be ready to move on to mastering bread making in a Dutch oven. Until then, check YouTube for some great recipes on easy-to-make dishes and don’t forget to try out a cobbler or two.
6 comments
This is just a super guide to to Dutch oven cooking. The only way to cook thanksJacl
Thank you for info on Dutch Oven. I need a smaller one. My Lodge with 3 prong feet works inside. We have fire hazards outside .
Thanks for the refresher. Good skills to have.
This was very helpful! Thx
Great bit presentation of common sense advice for new and us older experienced users as well.
Found a16" Dutch Oven Skillet about 50 years ago.
3 cast iron legs , 1" rim on the lid.
Can bake the most beautiful browned pie you ever sean on a camp fire.
Amazing to people who have no idea how our ancestors cooked.
Thanks for bringing thus memory back to me.
Th I s may be a renewed skill here soon the way things are going in our country.